Making the TFF Aerial

A forum to show any of your restored or built traditional fishing reels.
Post Reply
User avatar
Watermole+
Chub
Posts: 1057
Joined: Thu Mar 15, 2012 11:07 pm
12
Location: Devon & Cornwall border

Re: Making the TFF Aerial

Post by Watermole+ »

Part 2.

..Many thanks again for all the nice comments..and I've taken everything on board with regards to the question of pillars or otherwise.
I agree with you Nobby, that they can put a costly kink in the line and have also been thinking about luckyluca's idea of an optional 'wraparound' band. In fact, I think we have this problem solved now, thanks to your suggestions; -more of that later..

Have been making some progress with the backplate this week. It's still nowhere near complete but here is what's been happening. Fishing on the River Yealm has been completely knocked out for a while,-at least, where I go. Not only did we have the highest floods on record last Friday, which did dreadful damage and made National news, there has also been a big problem with sewage flowing into it! I haven't been there to see it but it's not good news and safe to say that it will be a while before anything like normal service can be resumed..

..But getting back to the backplate; I thought we could utilize the piece of tufnol left over from the Coxon project, for making the centre section element. Also, the side plates are now fully dried and ready for further work.

Image

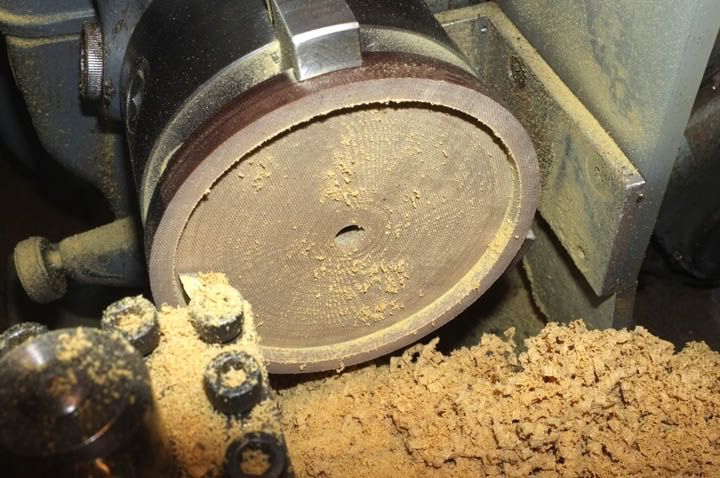
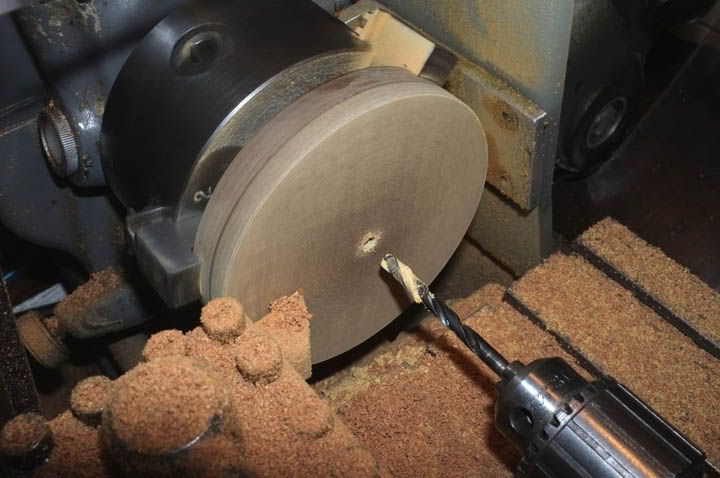
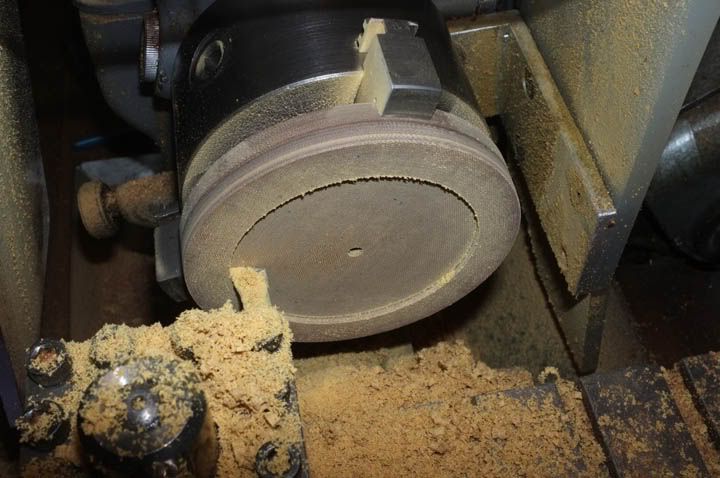
I sawed off the end part by hand, then started rough-turning the tufnol to thickness, plus 0.050" for finishing. I also put a 3/16" pilot drill through..

Image

..and recessed the back to accept the reinforcing ring and laminate plate..

Image

The reinforcing ring was turned from a piece of bronze; an old scrap bush from a machine, acquired very cheaply..
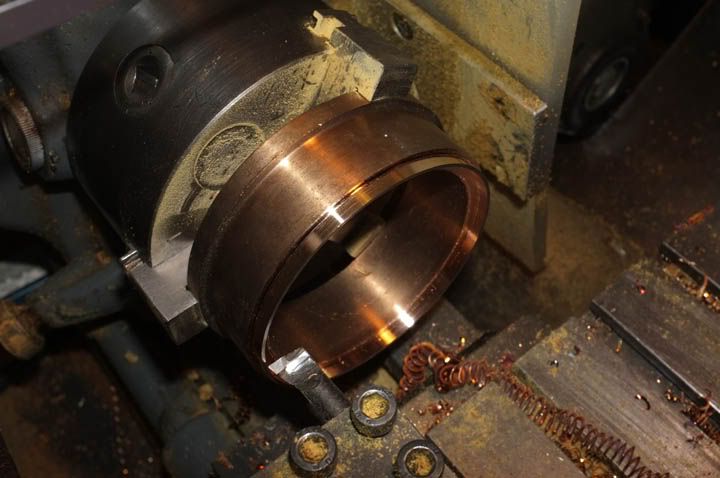
Image

..and parted off..

Image

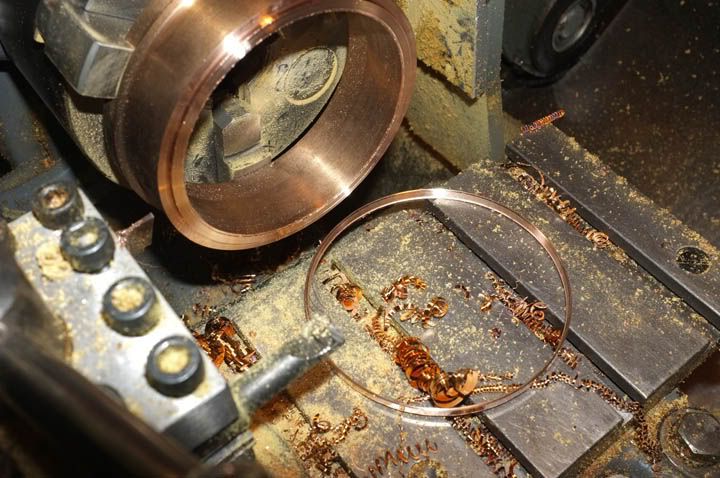
The surface finish is deliberately left rough so that the glue will key into it better.

Image

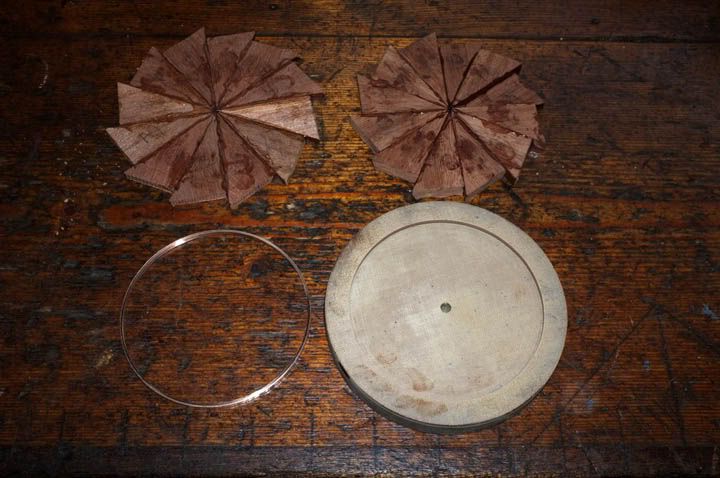
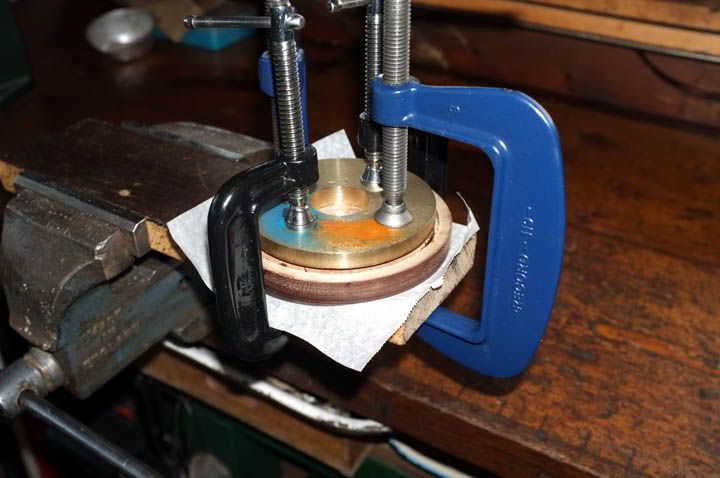
Here you see the ring now glued into place-

Image


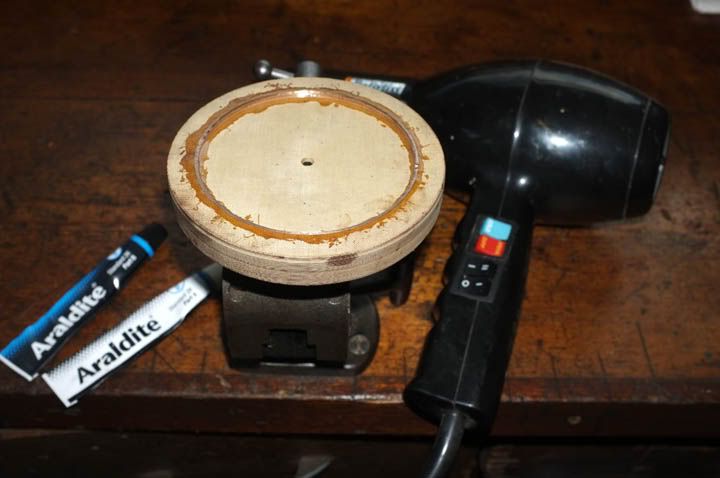
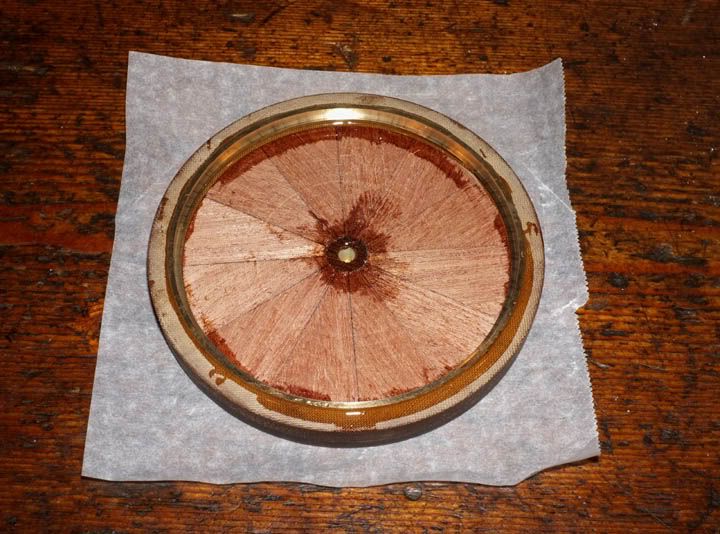
Again, I have used Araldite for this. After gluing, a quick blow with an old hairdryer to warm it, does wonders for making the glue flow nicely into and around all the material. I will leave that for at least one day before further machining. In the meantime, the inner-and outer laminate plates were trimmed with a hacksaw and the outsides turned true.

Image


Image

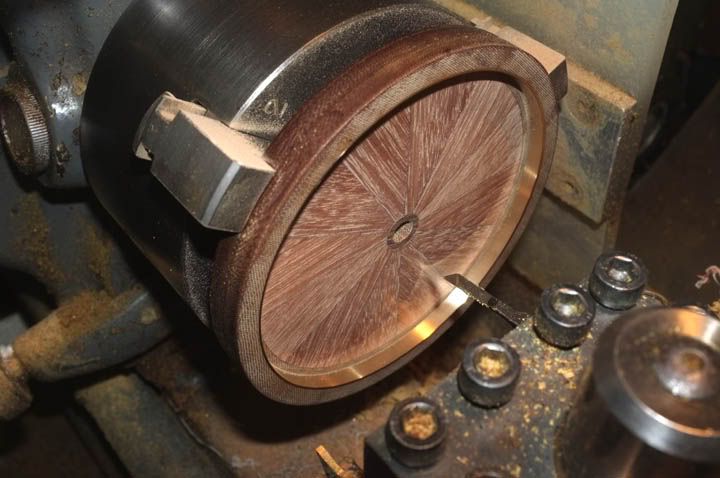
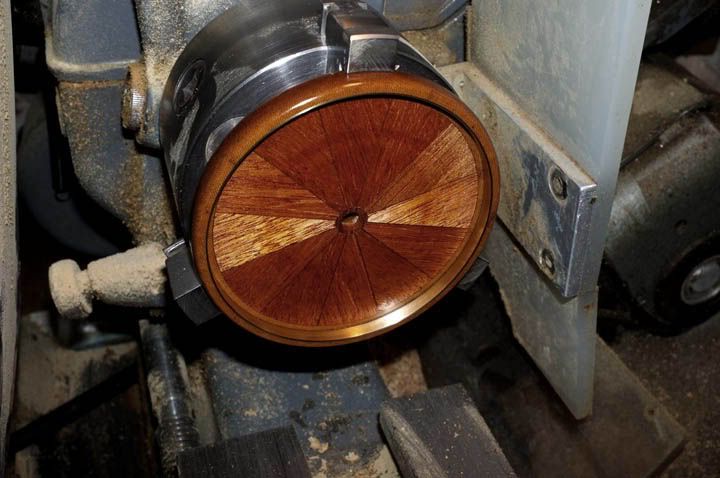
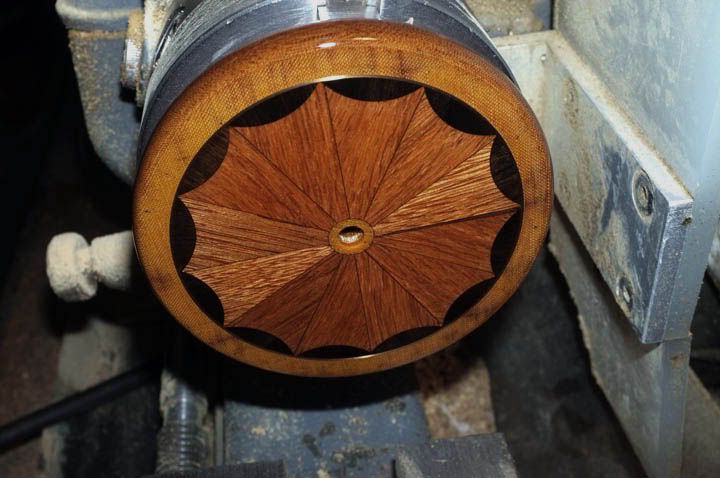
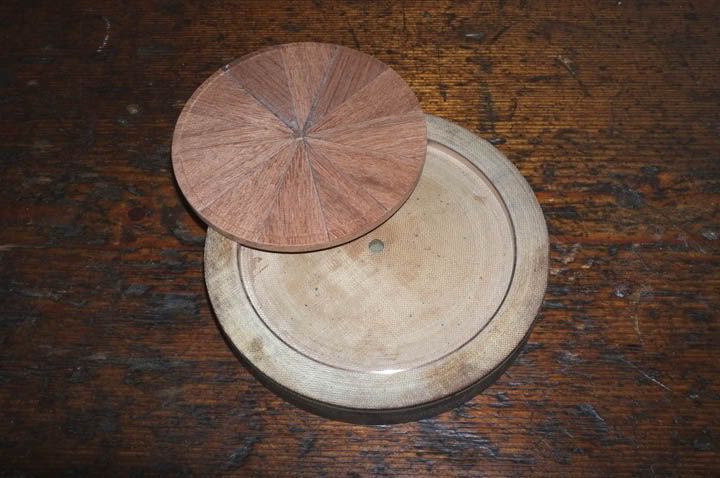
The outer was all ready to be glued into place..

Image

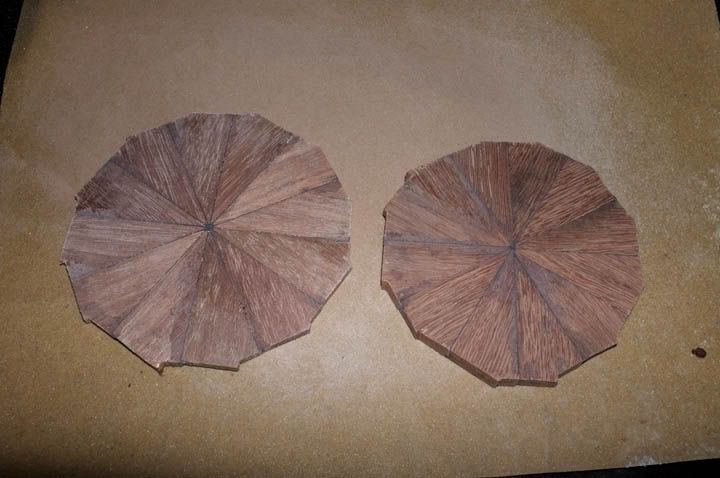
..but then I had a bit of an idea! Whilst looking through the box of wood off-cuts for something suitable to make the back from, I came across these two little scrap strips of real ebony..

Image

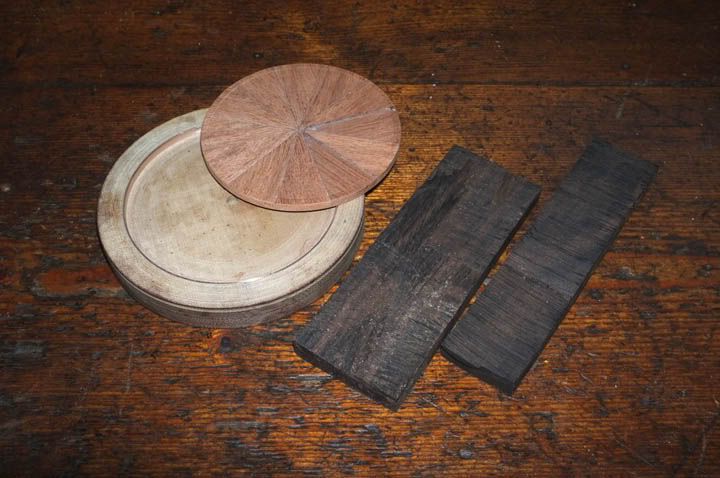
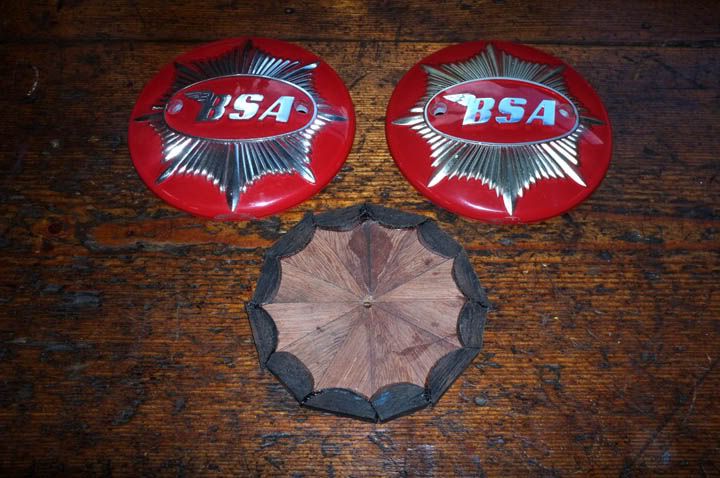
...and thought that, as it is a special project, we just might allow ourselves a little excess, decoratively speaking! I've never tried to do anything like this before so it all might go horribly wrong, in which case, we start again. It's an idea inspired by my old BSA tank badges..

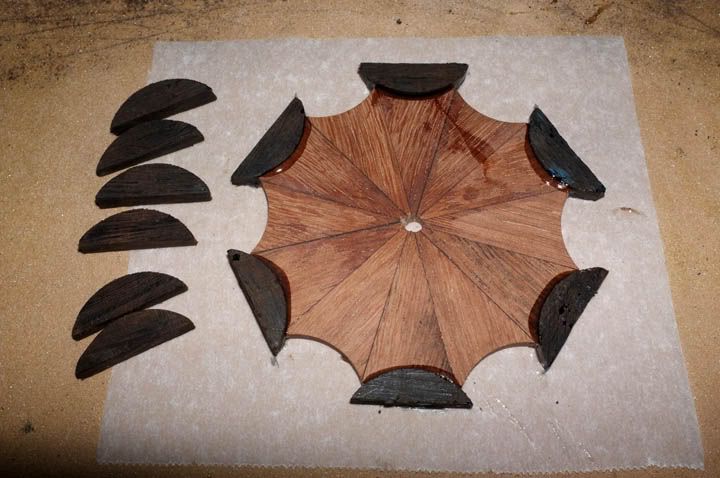
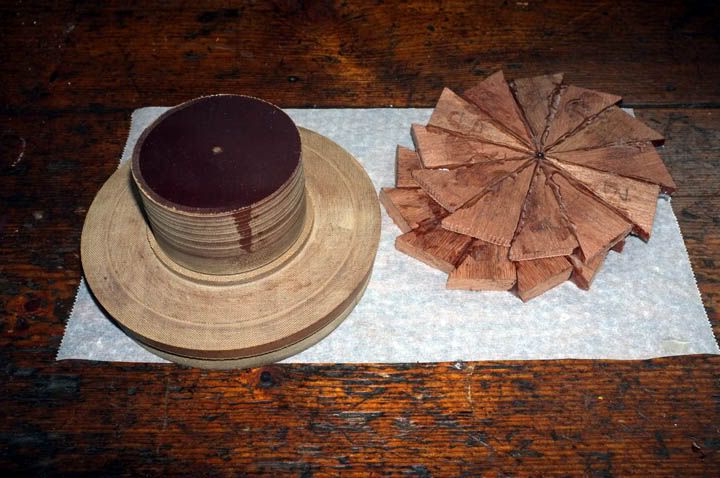
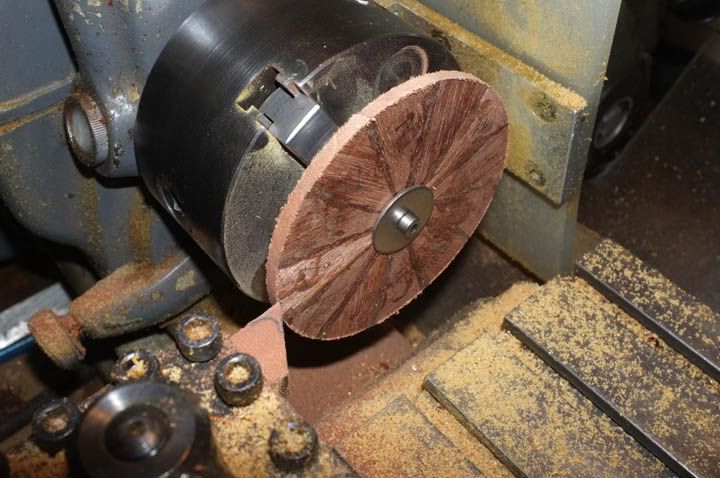
Using a very crude, but surprisingly accurate (for this job) method of division, we produced a concave form on the end of each mahogany segment.

Image

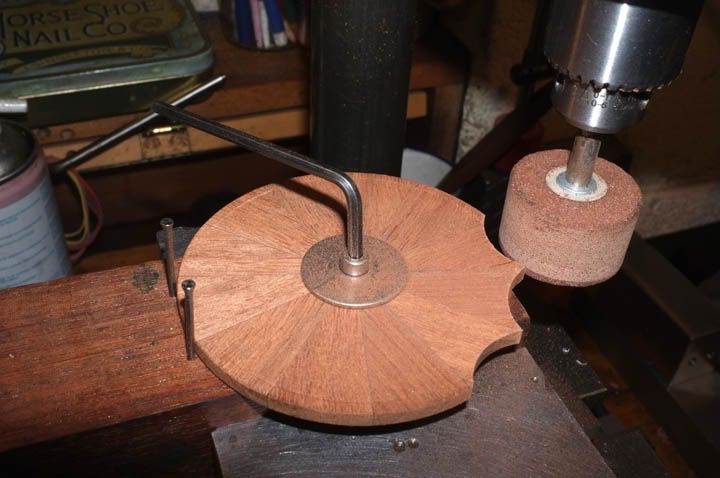
The set-up was very basic. A piece of wood with a hole in it held in the vice. The laminate was held by a screw and washer in the hole and division obtained by indexing to the two panel pins tapped into the wood to act as markers. The 'cutter' was a 1 1/4" diameter grinding stone held in the electric drill!

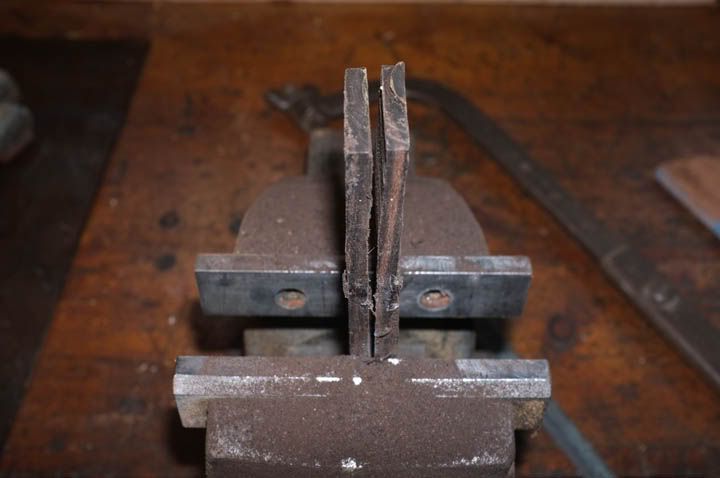
As the rough sawn pieces of ebony were about 1/4" thick, the first thing was to try and cut the thickness in half by sawing down the middle. It wasn't terribly accurate, but good enough for purpose..

Image

The pieces were then further divided by sawing into small lengths and planing flat on one side and drilling a small hole in the middle..

Image

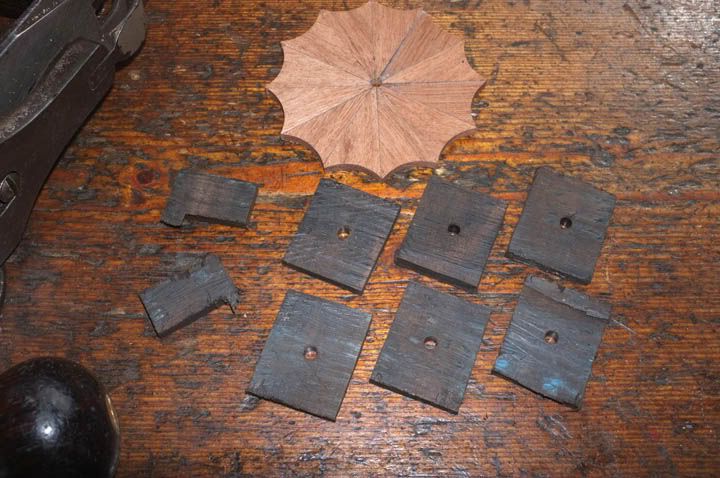
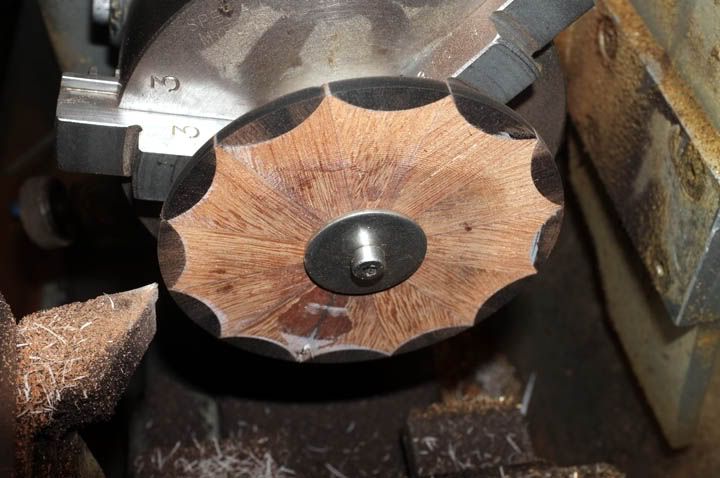
..which were then turned to 1 1/4" diameter by mounting on a simple arbor and clamping with a screw and washer.

Image

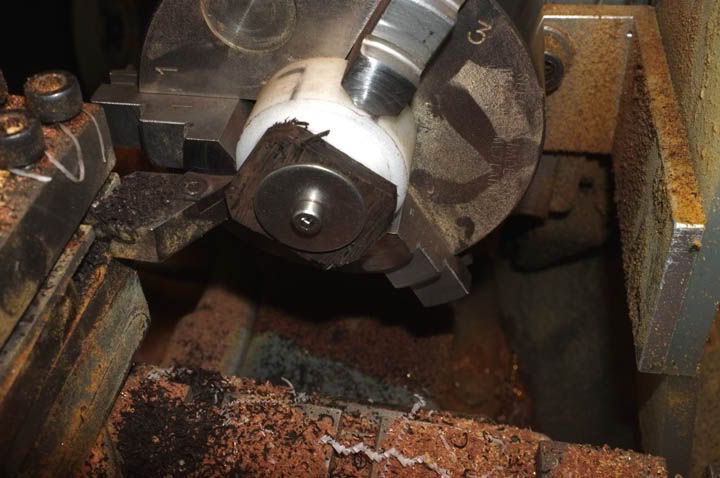
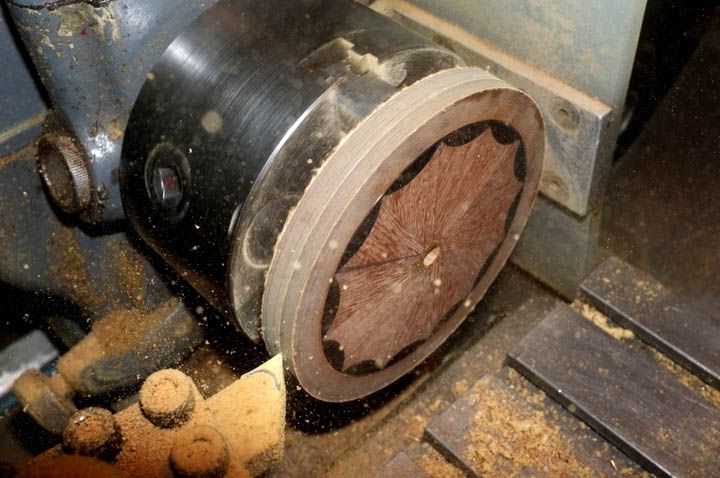
These were then cut again into little segments of arc, which will be glued into place on the laminate.

Image

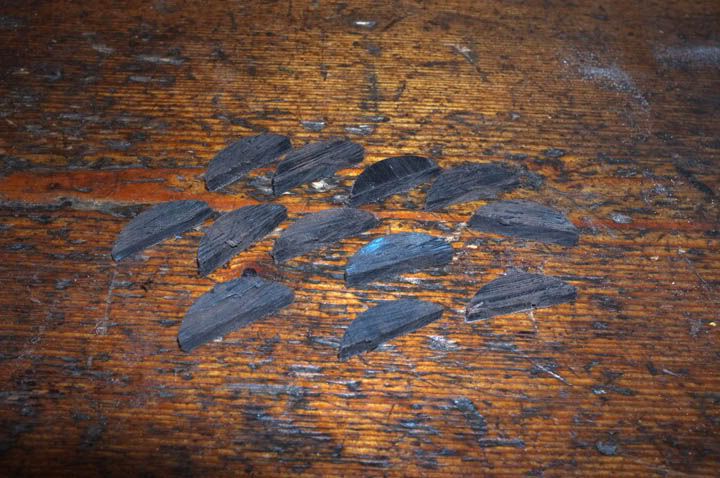
You can probably guess what happens next but will post some pictures of the result next time..

With regards,

wm+

"Are not two sparrows sold for a farthing? Yet one of them shall not fall without your Father knoweth" ..Jesus of Nazareth, King James AV

User avatar
Mark
Head Bailiff
Posts: 21193
Joined: Mon Aug 22, 2011 4:55 pm
12
Location: Leicestershire
Contact:

Re: Making the TFF Aerial

Post by Mark »

What :shocked: can :thumb: I :hat: say.
Mark (Administrator)

The most precious places in the English landscape are those secretive corners,
where you find only elder trees, nettles and dreams. (BB - Denys Watkins-Pitchford).

User avatar
Nobby
Wild Carp
Posts: 10987
Joined: Sun Oct 02, 2011 2:40 pm
12
Location: S.W.Surrey
Contact:

Re: Making the TFF Aerial

Post by Nobby »

Blimey!

I'm still amazed that you can glue a few bits of wood together will Araldite and then something so pretty ( bloke pretty, that is) can emerge.


I didn't quite get the BSA tank badge analogy though, thinking about three rifles ....but perhaps I should be thinking Empire Star?

http://www.free-images.org.uk/motorcycl ... e-star.htm

User avatar
St.John
Tench
Posts: 2760
Joined: Thu Sep 01, 2011 3:25 pm
12
Location: the monnow

Re: Making the TFF Aerial

Post by St.John »

I think I know what he's up to now!! Wow.
"Be patient and calm-for no man can catch fish in anger."

User avatar
Beresford
Sea Trout
Posts: 4261
Joined: Sat Dec 17, 2011 1:26 pm
12

Re: Making the TFF Aerial

Post by Beresford »

I can't wait to see this next part come together. As Nobby wrties it's really going to look 'bloke pretty!'
The Split Cane Splinter Group

User avatar
Loop Erimder
Wild Carp
Posts: 9984
Joined: Wed Apr 04, 2012 11:33 pm
12
Location: Leicestershire

Re: Making the TFF Aerial

Post by Loop Erimder »

Looking like the first project in the early stages you go and throw that into the mix!! Brilliant :cool: :thumb:
Chance is always powerful. Let your hook be always cast; in the pool where you least expect it, there will be a fish

User avatar
LuckyLuca
Barbel
Posts: 4792
Joined: Mon Jul 02, 2012 10:20 am
11
Location: Oxfordshire

Re: Making the TFF Aerial

Post by LuckyLuca »

WOW!

Nothing else, just wow!

I feel so inadequate now!
I walked across an empty land
I knew the pathway like the back of my hand
I felt the earth beneath my feet
Sat by the river and it made me complete.

User avatar
Watermole+
Chub
Posts: 1057
Joined: Thu Mar 15, 2012 11:07 pm
12
Location: Devon & Cornwall border

Re: Making the TFF Aerial

Post by Watermole+ »

Part 3. Finishing the backplate.

Have managed to crack on with the backplate this week, to the point where we can now kick that into touch and start thinking about the line drum.. ..Here is what's been happening:-

The small segments of ebony were planed flat on one side only and then six of them were glued into alternate positions on the laminate.

Image

The observant amongst you-which is all of you-will notice the thick, dark line between two of the mahogany pieces in the next picture. This is a faux-pas on my part and far from intentional. Last Saturday week, I was all ready to glue the ebony pieces in place, when I thought it would be a good plan to thoroughly dry out the laminate circle before glueing. Good idea! Unfortunately, the execution of it wasn't. The sun was shining so I placed the laminate on a piece of greaseproof paper and left it in a sunny spot for a few minutes, whilst mixing the glue. Of course the inevitable happened..the sunny side, being hotter then the shaded underneath part, dried quicker than the latter, thus causing it to warp and split and me to say "bother dash!" -or similar. I flattened it by water spraying the top and putting in a press until dry, but the crack will have to stay. I think we can save it by locating the crack under one of the brass arms of the star back; it's been glued again, so it should be OK.
Put this down to a 'Homer Simpson' moment...there'll be a few more I don't doubt!

Anyway, after the first six pieces were dry, I trimmed off the surplus ends of ebony and glued the second six segments into place. It was necessary to put all manner of weights and heavy objects onto everything, to hold it into place whilst the glue dried.

Nobby; -You were very close with your guess about the BSA 'Empire Star' tank badges..they were in fact 'Gold Star' badges! This pair are early 1960s vintage, still brand new and have never been fitted to a bike!

Image

The next thing was to mount the laminate on a simple arbor and turn the outside to be a snug fit in the centre section recess.

Image

This was then glued into place and when dried out, roughly turned true and flat.
Next, I reversed the centre section in the chuck jaws and cut a recess for what will be the inside of the back. This is in fact, a double recess,; firstly, to take the brass reinforcing band and secondly, to be a press-fit for the other, inside laminate.

Image

..As you see, quite a lot of swarf coming of here and Boy, doesn't it stink!

However, all was done and the laminate was glued in and securely clamped.

Image

When that was dry, the inside was turned again, to roughly finish the laminate to thickness.

Image

..Then the brass ring was glued in. The centre of the reel back has been bored to accept a small tufnol bush, also now fixed in, but not yet bored to size.

Image

Now the inside can be finished! Firstly, the brass ring was finish-turned to final diameter, the laminate has been recessed and faced off to final size and the tufnol bush finish-bored. It is vital that these three operations were done together, without removing the work from the chuck, in order to guarantee absolute concentricity.

Image

Then, the backplate was reversed and the back face and outside, both finished to size and shape. This action shot shows just how tufnol dust flies..!

Image

I thought it best to put on a coat of polish, to stop any damp getting in to the wood.. ..it's not by any means finished yet but even one coat certainly makes all the difference!
This is the inside but there'll be a lot of holes etc. to go into it yet..

Image

..and this is the outside. The final finish will be a bit darker than this..

Image


Next time, we'll make a start on the line drum..I have in fact, already bought a piece of top-grade, certificated aircraft grade, duralumin alloy for the job and started some preliminary calculations.. ..but that's for next time!

With regards,

wm+

"Are not two sparrows sold for a farthing? Yet one of them shall not fall without your Father knoweth" ..Jesus of Nazareth, King James AV

User avatar
Mark
Head Bailiff
Posts: 21193
Joined: Mon Aug 22, 2011 4:55 pm
12
Location: Leicestershire
Contact:

Re: Making the TFF Aerial

Post by Mark »

It's looking beautiful already wm+. :hat:
Mark (Administrator)

The most precious places in the English landscape are those secretive corners,
where you find only elder trees, nettles and dreams. (BB - Denys Watkins-Pitchford).

User avatar
Richard C
Brown Trout
Posts: 1413
Joined: Sun Mar 25, 2012 11:59 am
12
Location: East Sussex

Re: Making the TFF Aerial

Post by Richard C »

Mark wrote:It's looking beautiful already wm+. :hat:
Agreed. A joy to watch develop. Bravo sir. :thumb:
"We shall not cease from exploration. And the end of all our exploring will be to arrive where we started and know the place for the first time.".
T. S Eliot
http://richard-cleaver.blogspot.co.uk/

Post Reply

Return to “Traditional Reel Building and Restoring”