Making the TFF Aerial
-
Beresford

- Sea Trout
- Posts: 4261
- Joined: Sat Dec 17, 2011 1:26 pm
- 12
-
TemeLAD

- Crucian Carp
- Posts: 971
- Joined: Thu Jun 07, 2012 8:16 pm
- 12
Re: Making the TFF Aerial
Fascinating - love the detail of the photographs and the clear explanation of each process.
"I can't wait to buy a bamboo pole and a filament of line and a tube of breadcrumbs. I want to participate in this practice which allows a man to be alone with himself in dignity and peace. It seems a very precious thing to me".
John Steinbeck
John Steinbeck
-
The Sweetcorn Kid

- Wild Carp
- Posts: 11792
- Joined: Fri Aug 26, 2011 7:09 pm
- 12
- Location: Portsmouth
- Contact:
Re: Making the TFF Aerial
Marvellous as always sir!!! :hat: :hat: :hat:
SK
The Compleat Tangler
“Imagination is the real magic that exists in this world. Look inwards to see outwards. And capture it in writing.”
Nigel 'Fennel' Hudson
Click here for my Youtube Channel...
https://www.youtube.com/channel/UCeoyLH ... 5H4u8sTDgA
The Compleat Tangler
“Imagination is the real magic that exists in this world. Look inwards to see outwards. And capture it in writing.”
Nigel 'Fennel' Hudson
Click here for my Youtube Channel...
https://www.youtube.com/channel/UCeoyLH ... 5H4u8sTDgA
-
Watermole+

- Chub
- Posts: 1058
- Joined: Thu Mar 15, 2012 11:07 pm
- 12
- Location: Devon & Cornwall border
Re: Making the TFF Aerial
Part 9. Making the Star Back.
I've just noticed that in the last part, I've shown the check wheel but not how it was made!
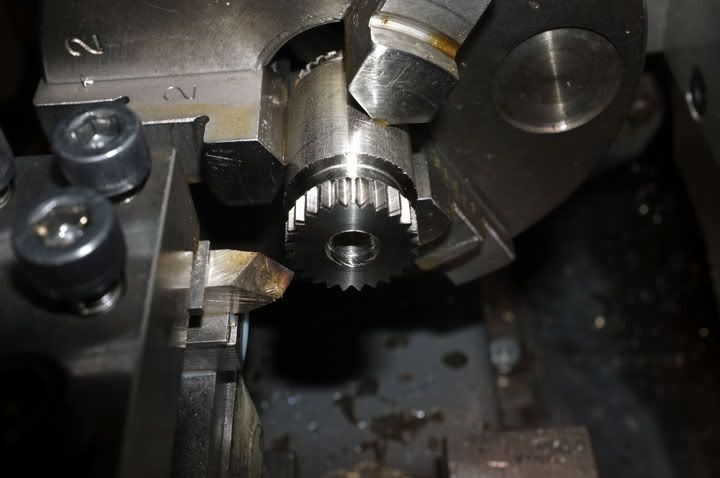
Essentially, it was exactly as in the last project so will just show a couple of pictures to give you the general idea. It was made from a piece of hardenable steel which was turned to diameter, drilled & bored to a light, press fit on the hub end, then the teeth were broached in by hand by making several passes across with a tool made from 'stellite'.
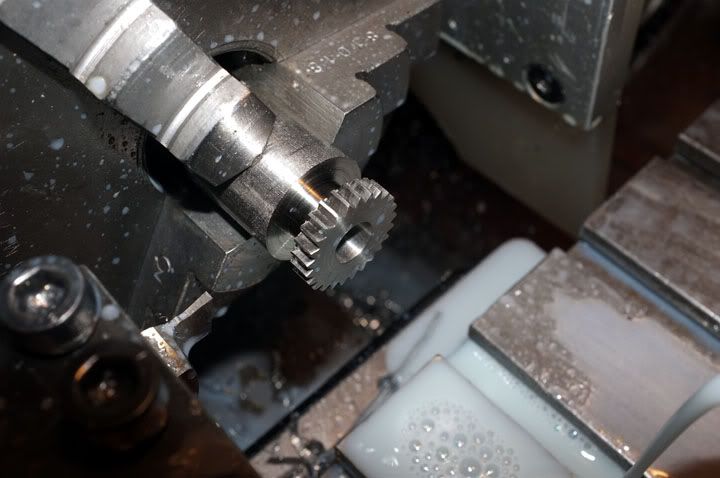
The back was then turned to thickness, parted off and de-burred. It was then flame-hardened and quenched in light oil.
Here you see the teeth being broached in; this is almost complete.
The back being undercut to produce the boss, prior to parting off.
The Star back.
Again, this was a similar process to that when making the Coxon.
I started by taking two lengths of 3/4" x 1/8" flat brass strip (available at a Hobbies & Crafts shop), roughly filing out 'flats' on each to make a joint which was then thoroughly "tinned" with Bakers Soldering Fluid and then soldered together. I'm getting a bit better with the big Iron now and did it much better this time!

After it had cooled off, it was washed to remove the acid and then the centre hole was carefully reamed out to size with a tapered, hand reamer.

The next step was to cut the 'legs' of the 'star' to identical length and roughly file flat. I am not worried about finish at this stage.
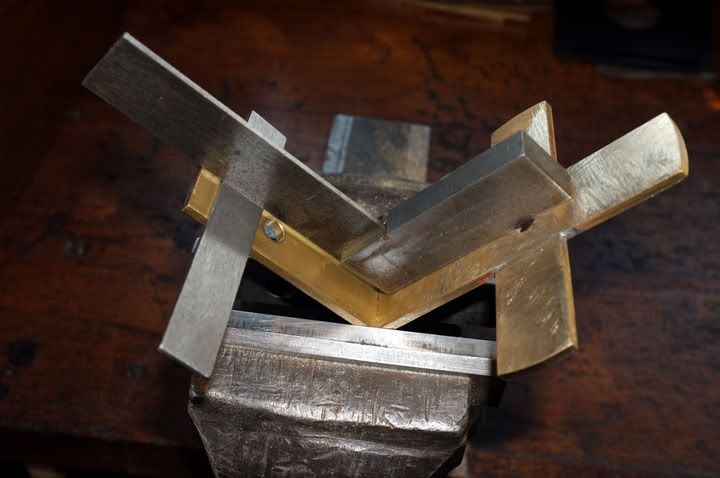
Next, the top part, where the reel seat goes, had to be joined on. This was done by filing a tenon joint on to both parts and soldering together. This is the main section being cut..
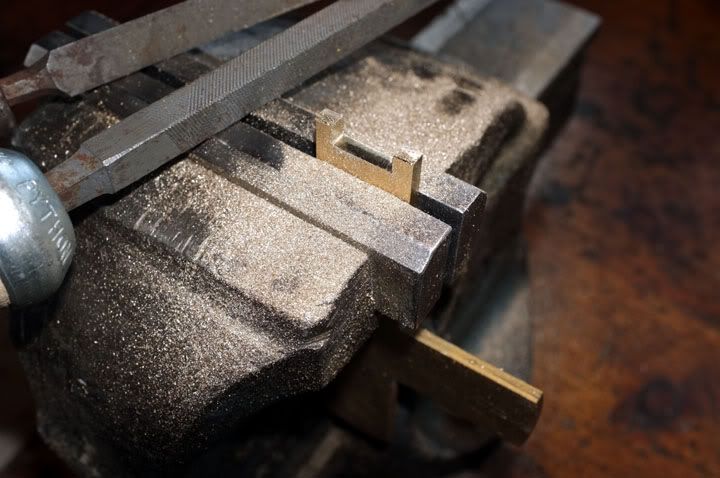
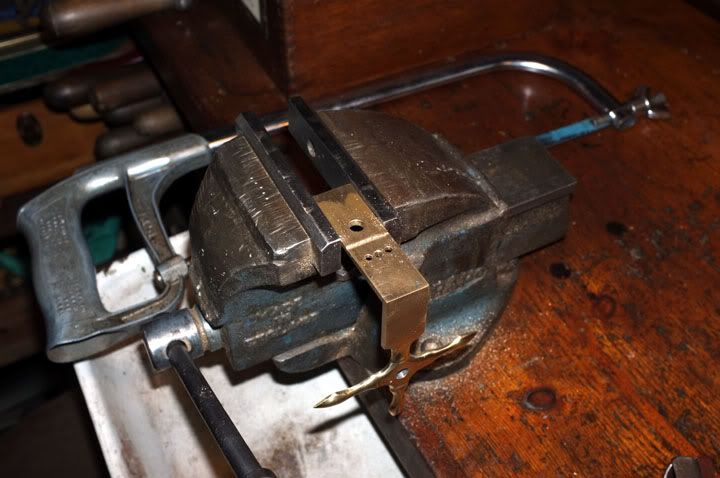
The small section was filed to be a good mating fit with this, then set up for soldering by gripping in the vice and adjusting position until it was adjacent, according to my try-square.
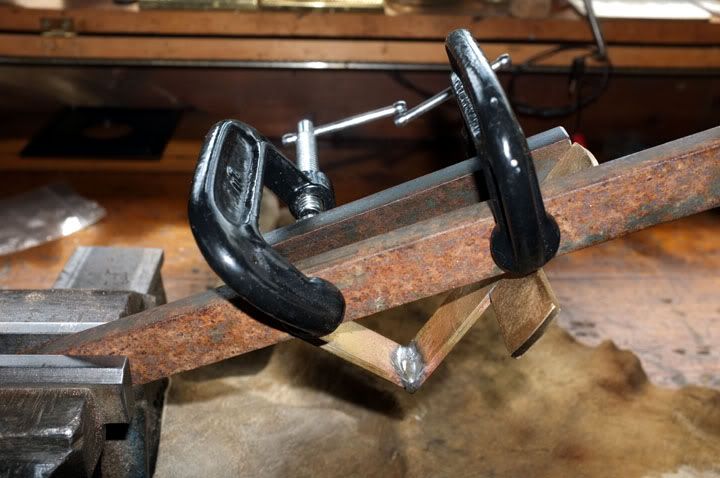
It was then clamped with a couple of pieces of scrap steel strip and two 'G'-clamps to hold securely, then thoroughly soldered.
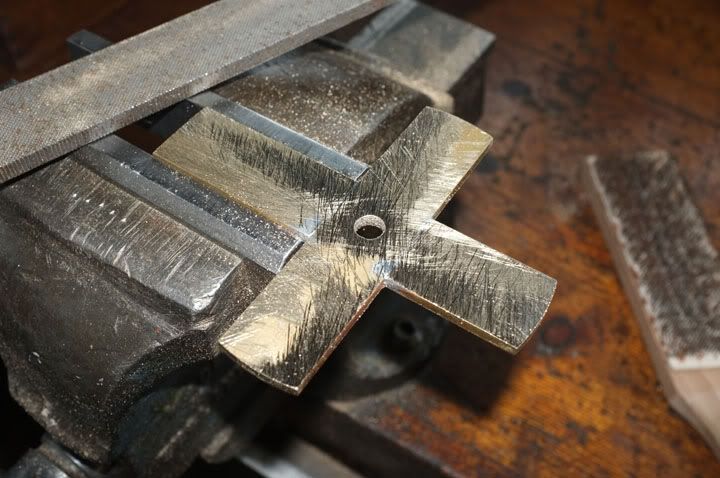
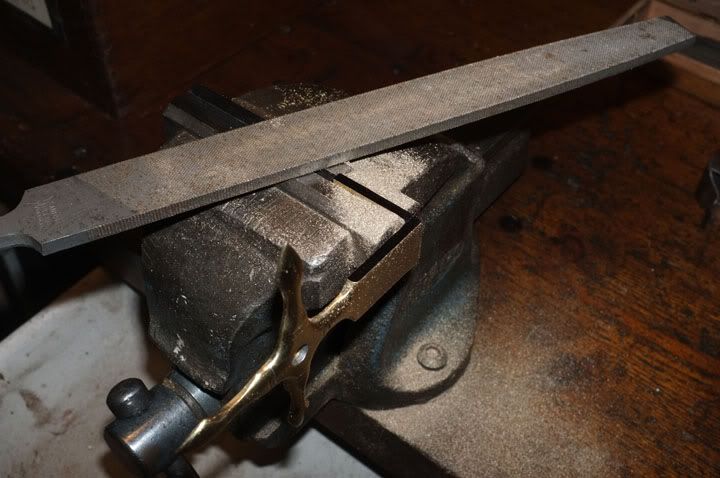
Next, the detail cutting lines were marked out and then it was a question of Making with the files and elbow grease..!
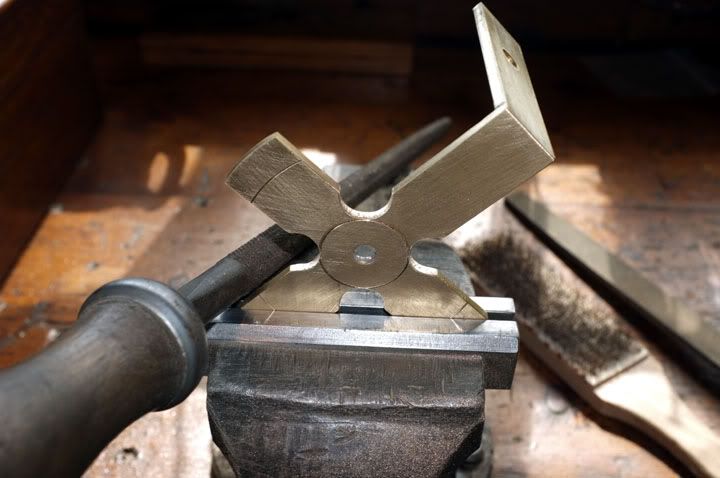
I'm sure you don't need to see every stage but suffice to say that, after some warm work, the star back pattern was filed out. I'm making it a lot lighter this time-more in keeping with the general appearance and aesthetics, without sacrificing any strength.
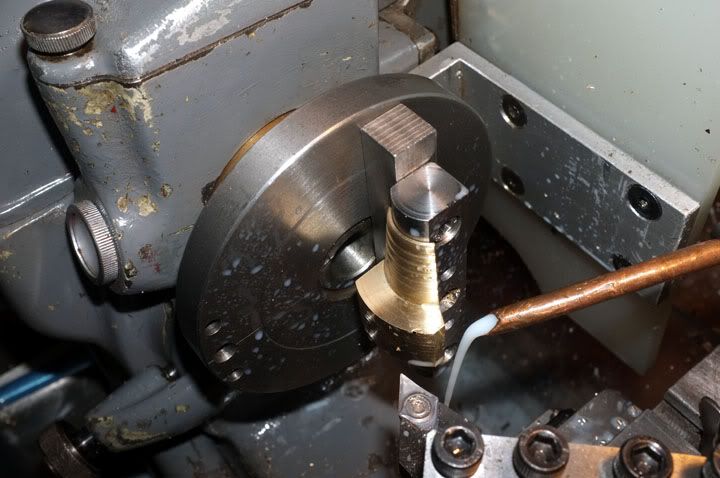
At this stage, I made the reel seat, exactly as last time so please refer to the last project for picture details. This is turning the sides to thickness, using a little lathe fixture. I've noticed that someone else has copied this set-up for making a fly reel, on another forum; rather nice to see that.
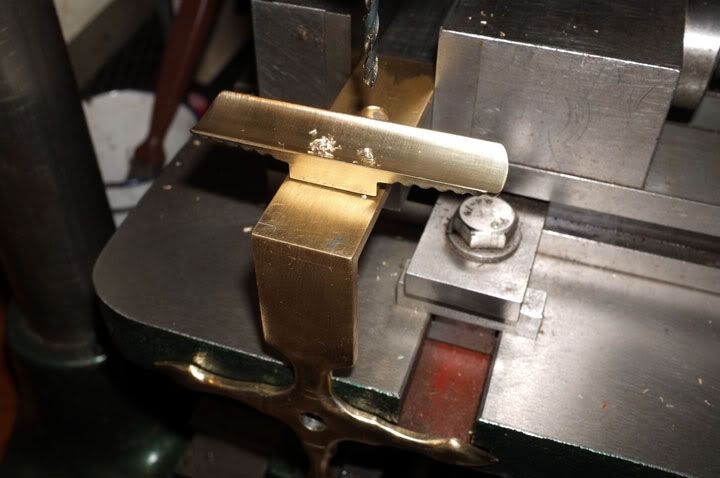
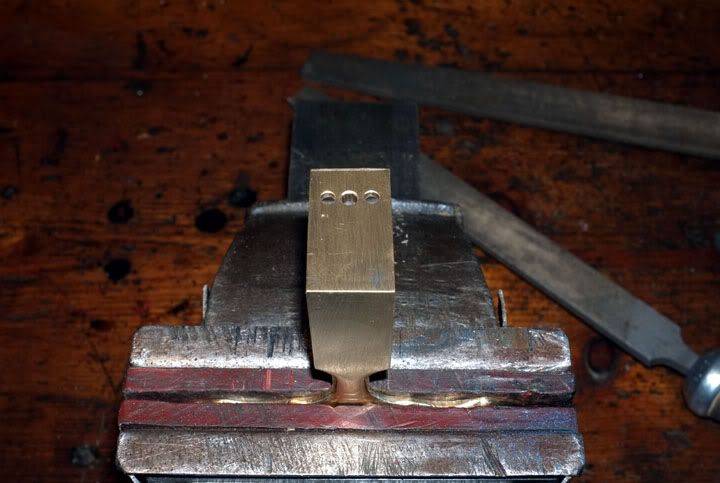
Now we have to join the seat to the star back. This was done as before, by turning a dowel on the seat itself, locating it in the top of the back and securing with two screws. I used brass ones this time (looks nicer!). Here, I am drilling the holes..
Now the excess metal can be cut away..
..and the tapered sides filed.
Nearly there..
The reel seat can now be fitted..
..and the detail work finish-filed. You can see the brass screws underneath. The above picture shows the inside of the back, which will never be seen.
Most of the work is done on this now and it's all ready for polishing.
Next time, we will be starting work on the optional, adjustable check, but to be honest, I haven't yet worked out any of the details !! ..Let's just see what happens....
Regards,
wm+
I've just noticed that in the last part, I've shown the check wheel but not how it was made!
Essentially, it was exactly as in the last project so will just show a couple of pictures to give you the general idea. It was made from a piece of hardenable steel which was turned to diameter, drilled & bored to a light, press fit on the hub end, then the teeth were broached in by hand by making several passes across with a tool made from 'stellite'.
The back was then turned to thickness, parted off and de-burred. It was then flame-hardened and quenched in light oil.
Here you see the teeth being broached in; this is almost complete.
The back being undercut to produce the boss, prior to parting off.
The Star back.
Again, this was a similar process to that when making the Coxon.
I started by taking two lengths of 3/4" x 1/8" flat brass strip (available at a Hobbies & Crafts shop), roughly filing out 'flats' on each to make a joint which was then thoroughly "tinned" with Bakers Soldering Fluid and then soldered together. I'm getting a bit better with the big Iron now and did it much better this time!
After it had cooled off, it was washed to remove the acid and then the centre hole was carefully reamed out to size with a tapered, hand reamer.
The next step was to cut the 'legs' of the 'star' to identical length and roughly file flat. I am not worried about finish at this stage.
Next, the top part, where the reel seat goes, had to be joined on. This was done by filing a tenon joint on to both parts and soldering together. This is the main section being cut..
The small section was filed to be a good mating fit with this, then set up for soldering by gripping in the vice and adjusting position until it was adjacent, according to my try-square.
It was then clamped with a couple of pieces of scrap steel strip and two 'G'-clamps to hold securely, then thoroughly soldered.
Next, the detail cutting lines were marked out and then it was a question of Making with the files and elbow grease..!
I'm sure you don't need to see every stage but suffice to say that, after some warm work, the star back pattern was filed out. I'm making it a lot lighter this time-more in keeping with the general appearance and aesthetics, without sacrificing any strength.
At this stage, I made the reel seat, exactly as last time so please refer to the last project for picture details. This is turning the sides to thickness, using a little lathe fixture. I've noticed that someone else has copied this set-up for making a fly reel, on another forum; rather nice to see that.
Now we have to join the seat to the star back. This was done as before, by turning a dowel on the seat itself, locating it in the top of the back and securing with two screws. I used brass ones this time (looks nicer!). Here, I am drilling the holes..
Now the excess metal can be cut away..
..and the tapered sides filed.
Nearly there..
The reel seat can now be fitted..
..and the detail work finish-filed. You can see the brass screws underneath. The above picture shows the inside of the back, which will never be seen.
Most of the work is done on this now and it's all ready for polishing.
Next time, we will be starting work on the optional, adjustable check, but to be honest, I haven't yet worked out any of the details !! ..Let's just see what happens....
Regards,
wm+
"Are not two sparrows sold for a farthing? Yet one of them shall not fall without your Father knoweth" ..Jesus of Nazareth, King James AV
-
Loop Erimder

- Wild Carp
- Posts: 9984
- Joined: Wed Apr 04, 2012 11:33 pm
- 12
- Location: Leicestershire
Re: Making the TFF Aerial
Lovely as ever WM+ :thumb:
Chance is always powerful. Let your hook be always cast; in the pool where you least expect it, there will be a fish
-
Mark
- Head Bailiff
- Posts: 21238
- Joined: Mon Aug 22, 2011 4:55 pm
- 12
- Location: Leicestershire
- Contact:
Re: Making the TFF Aerial
:hat: :hat: :hat:
Mark (Administrator)
The most precious places in the English landscape are those secretive corners,
where you find only elder trees, nettles and dreams. (BB - Denys Watkins-Pitchford).
The most precious places in the English landscape are those secretive corners,
where you find only elder trees, nettles and dreams. (BB - Denys Watkins-Pitchford).
-
MGs

- Pike
- Posts: 6430
- Joined: Wed Nov 02, 2011 2:24 pm
- 12
- Location: Cornwall
-
Beresford
- Sea Trout
- Posts: 4261
- Joined: Sat Dec 17, 2011 1:26 pm
- 12
-
George387

- Crucian Carp
- Posts: 849
- Joined: Wed Feb 08, 2012 10:36 pm
- 12
- Location: North Yorkshire
- Contact:
Re: Making the TFF Aerial
lovely as always
Brown Trout maybe Beautiful But Grayling are Gorgeous. "Lets Tackle Cancer" Supporter
The Flee & Float
The Flee & Float
-
Trevor

- Eel
- Posts: 2276
- Joined: Thu Mar 15, 2012 9:44 am
- 12
- Location: Oxfordshire
Re: Making the TFF Aerial
Shaping up nicely again :hat: